In the ever-evolving world of iOS development, creating adaptive user interfaces is crucial for delivering a seamless experience across various devices and orientations. SwiftUI provides several powerful tools to help developers craft flexible layouts that respond gracefully to different screen sizes and configurations. Let’s explore some key techniques for adaptive design in SwiftUI.
ViewThatFits: Automatic Layout Adaptation
ViewThatFits is a SwiftUI container view that automatically selects the first child view that fits within the available space. This powerful tool simplifies the process of creating adaptive layouts by allowing you to define multiple layout options and letting SwiftUI choose the most appropriate one. Here’s an example of how to use ViewThatFits:
ViewThatFits {
    HStack {
        Image(systemName: "star.fill")
        Text("Favorite")
    }

    Image(systemName: "star.fill")
}
In this example, SwiftUI will display the HStack with both the image and text if there’s enough space. If not, it will fall back to showing just the image.
Size Classes: Adapting to Device Characteristics
Size Classes in SwiftUI allow you to adapt your layout based on the available space and device characteristics. By using the @Environment property wrapper, you can access the current horizontal and vertical size classes to make layout decisions.
Here’s how you can use size classes to adjust your layout:
@Environment(\.horizontalSizeClass) var horizontalSizeClass

var body: some View {
    Group {
        if horizontalSizeClass == .compact {
            VStack {
                // Compact layout
            }
        } else {
            HStack {
                // Regular layout
            }
        }
    }
}
This approach allows you to create distinct layouts for different device configurations, such as iPhones in portrait mode versus iPads in landscape mode. Here you can find all the size classes for each Apple Device.
GeometryReader: Fine-Grained Layout Control
GeometryReader is a powerful tool that provides detailed information about the size and position of its parent view. This allows for precise control over layout and sizing based on the available space. Here’s an example of using GeometryReader to create a responsive layout:
GeometryReader { geometry in
    VStack {
        Text("Hello, World!")
            .font(.system(size: geometry.size.width / 10))

        Rectangle()
            .fill(Color.blue)
            .frame(width: geometry.size.width * 0.8, height: 50)
    }
}
In this example, the text size and rectangle width are dynamically calculated based on the available width, ensuring the layout remains proportional across different screen sizes.
UIScreen.main.bounds.width: A Practice to Avoid
While it might be tempting to use UIScreen.main.bounds.width for layout calculations, this approach is considered bad practice in SwiftUI. It doesn’t account for factors like Split View on iPad, rotation changes, or future device form factors.
Instead of relying on UIScreen.main.bounds.width, it’s better to use SwiftUI’s built-in layout system, including GeometryReader, size classes, and flexible spacing. These tools provide a more robust and future-proof way to create adaptive layouts.
Conclusion
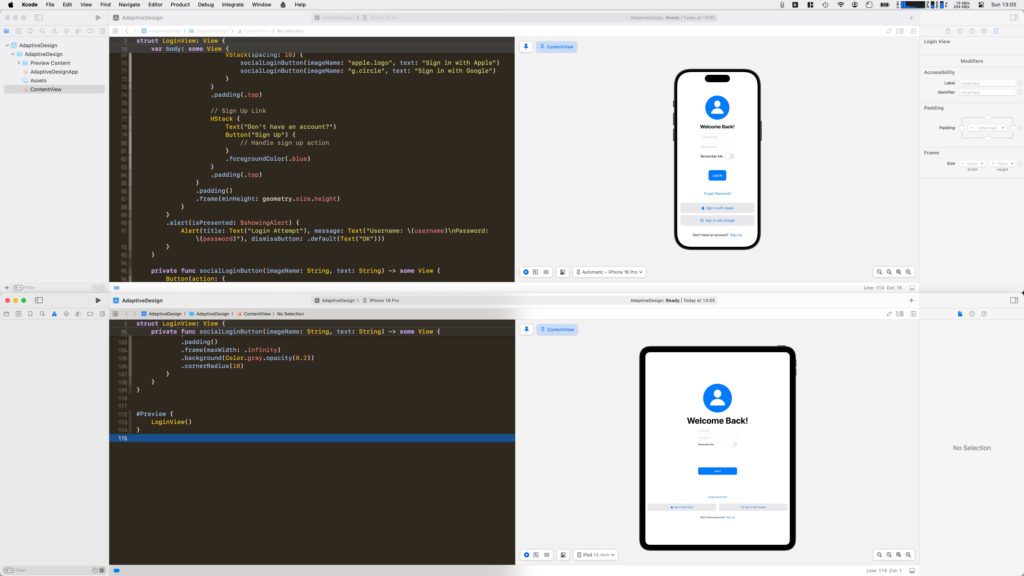
Adaptive design in SwiftUI is about creating flexible, responsive layouts that work well across all iOS devices. By leveraging tools like ViewThatFits, size classes, and GeometryReader, you can create UIs that automatically adjust to different screen sizes and orientations. Remember to avoid hard-coding dimensions or relying on specific device characteristics, and instead embrace SwiftUI’s powerful layout system for truly adaptive designs.
Here is a Login Screen example;
import SwiftUI

struct LoginView: View {
    @State private var username = ""
    @State private var password = ""
    @State private var rememberMe = false
    @State private var showingAlert = false
    @Environment(\.horizontalSizeClass) var horizontalSizeClass

    var body: some View {
        GeometryReader { geometry in
            ScrollView {
                VStack(spacing: 20) {
                    // Avatar Image
                    Image(systemName: "person.circle.fill")
                        .resizable()
                        .aspectRatio(contentMode: .fit)
                        .frame(width: horizontalSizeClass == .compact ? geometry.size.width * 0.3 : geometry.size.width * 0.2)
                        .foregroundColor(.blue)
                        .padding(.top, 40)

                    // Welcome Text
                    Text("Welcome Back!")
                        .font(.system(size: geometry.size.width * 0.06))
                        .fontWeight(.bold)

                    // Login Form
                    VStack(spacing: 15) {
                        TextField("Username", text: $username)
                            .textFieldStyle(RoundedBorderTextFieldStyle())
                            .autocapitalization(.none)

                        SecureField("Password", text: $password)
                            .textFieldStyle(RoundedBorderTextFieldStyle())

                        Toggle("Remember Me", isOn: $rememberMe)
                    }
                    .padding(.horizontal)
                    .frame(width: horizontalSizeClass == .compact ? geometry.size.width * 0.5 : geometry.size.width * 0.3)

                    // Login Button
                    Button(action: {
                        // Perform login action
                        showingAlert = true
                    }) {
                        Text("Log In")
                            .fontWeight(.semibold)
                            .foregroundColor(.white)
                            .frame(maxWidth: .infinity)
                            .padding()
                            .background(Color.blue)
                            .cornerRadius(10)
                    }
                    .padding(.horizontal)
                    .frame(width: geometry.size.width * 0.3, height: geometry.size.width * 0.3)

                    // Forgot Password Link
                    Button("Forgot Password?") {
                        // Handle forgot password action
                    }
                    .foregroundColor(.blue)

                    // Social Login Options
                    ViewThatFits {
                        HStack(spacing: 20) {
                            socialLoginButton(imageName: "apple.logo", text: "Sign in with Apple")
                            socialLoginButton(imageName: "g.circle", text: "Sign in with Google")
                        }
                        VStack(spacing: 10) {
                            socialLoginButton(imageName: "apple.logo", text: "Sign in with Apple")
                            socialLoginButton(imageName: "g.circle", text: "Sign in with Google")
                        }
                    }
                    .padding(.top)

                    // Sign Up Link
                    HStack {
                        Text("Don't have an account?")

                        Button("Sign Up") {
                            // Handle sign up action
                        }
                        .foregroundColor(.blue)
                    }
                    .padding(.top)
                }
                .padding()
                .frame(minHeight: geometry.size.height)
            }
        }
        .alert(isPresented: $showingAlert) {
            Alert(title: Text("Login Attempt"), message: Text("Username: \(username)\nPassword: \(password)"), dismissButton: .default(Text("OK")))
        }
    }

    private func socialLoginButton(imageName: String, text: String) -> some View {
        Button(action: {
            // Handle social login action
        }) {
            HStack {
                Image(systemName: imageName)

                Text(text)
            }
            .padding()
            .frame(maxWidth: .infinity)
            .background(Color.gray.opacity(0.2))
            .cornerRadius(10)
        }
    }
}


#Preview {
    LoginView()
}